

1、查看是否已经安装Mysql
rpm -qa | grep mysql
我已经安装过了
[root@localhost ~]# rpm -qa | grep mysql
bt-mysql57-5.7.37-1.el7.x86_64
如果你查看出来有东西,可以使用下面命令将其删除
rpm -e 文件名
[root@localhost ~]# rpm -e bt-mysql57-5.7.37-1.el7.x86_64如果提示warning: waiting for transaction lock on /var/lib/rpm/.rpm.lock,则需要执行
[root@localhost ~]# rm -f /var/lib/rpm/.rpm.lock2、下载官方Mysql包
wget -i -c http://dev.mysql.com/get/mysql57-community-release-el7-10.noarch.rpm
[root@localhost ~]# wget -i -c http://dev.mysql.com/get/mysql57-community-release-el7-10.noarch.rpm
--2022-06-09 13:25:18-- http://dev.mysql.com/get/mysql57-community-release-el7-10.noarch.rpm
Resolving dev.mysql.com (dev.mysql.com)... 137.254.60.11
Connecting to dev.mysql.com (dev.mysql.com)|137.254.60.11|:80... connected.
HTTP request sent, awaiting response... 301 Moved Permanently
Location: https://dev.mysql.com/get/mysql57-community-release-el7-10.noarch.rpm [following]
--2022-06-09 13:25:19-- https://dev.mysql.com/get/mysql57-community-release-el7-10.noarch.rpm
Connecting to dev.mysql.com (dev.mysql.com)|137.254.60.11|:443... connected.
HTTP request sent, awaiting response... 302 Found
Location: https://repo.mysql.com//mysql57-community-release-el7-10.noarch.rpm [following]
--2022-06-09 13:25:21-- https://repo.mysql.com//mysql57-community-release-el7-10.noarch.rpm
Resolving repo.mysql.com (repo.mysql.com)... 96.17.188.242
Connecting to repo.mysql.com (repo.mysql.com)|96.17.188.242|:443... connected.
HTTP request sent, awaiting response... 200 OK
Length: 25548 (25K) [application/x-redhat-package-manager]
Saving to: ‘mysql57-community-release-el7-10.noarch.rpm’
100%[============================================================================>] 25,548 38.5KB/s in 0.6s
2022-06-09 13:25:23 (38.5 KB/s) - ‘mysql57-community-release-el7-10.noarch.rpm’ saved [25548/25548]
-c: No such file or directory
No URLs found in -c.
FINISHED --2022-06-09 13:25:23--
Total wall clock time: 4.6s
Downloaded: 1 files, 25K in 0.6s (38.5 KB/s)
如果提示:-bash: wget: command not found则是未安装wget
可以通过yum -y install wget来安装
如果安装有提示:Cannot write to ‘mysql57-community-release-el7-10.noarch.rpm’ (No such file or directory),那就是权限不够
可以输入 su root 来解决,然后重新下载。
3、安装MysQL包
yum -y install mysql57-community-release-el7-10.noarch.rpm
[root@localhost ~]# yum -y install mysql57-community-release-el7-10.noarch.rpm
Loaded plugins: fastestmirror
Examining mysql57-community-release-el7-10.noarch.rpm: mysql57-community-release-el7-10.noarch
Marking mysql57-community-release-el7-10.noarch.rpm to be installed
Resolving Dependencies
--> Running transaction check
---> Package mysql57-community-release.noarch 0:el7-10 will be installed
--> Finished Dependency Resolution
Dependencies Resolved
======================================================================================================================
Package Arch Version Repository Size
======================================================================================================================
Installing:
mysql57-community-release noarch el7-10 /mysql57-community-release-el7-10.noarch 30 k
Transaction Summary
======================================================================================================================
Install 1 Package
Total size: 30 k
Installed size: 30 k
Downloading packages:
Running transaction check
Running transaction test
Transaction test succeeded
Running transaction
Warning: RPMDB altered outside of yum.
Installing : mysql57-community-release-el7-10.noarch 1/1
Verifying : mysql57-community-release-el7-10.noarch 1/1
Installed:
mysql57-community-release.noarch 0:el7-10
Complete!
4、安装MySQL
yum -y install mysql-community-server
[root@localhost ~]# yum -y install mysql-community-server
如果执行命令过程中提示:Failing package is: mysql-community-client-5.7.38-1.el7.x86_64 GPG Keys are configured as: file://则是因为MySQL GPG秘钥过期导致
执行命令解决
rpm --import https://repo.mysql.com/RPM-GPG-KEY-mysql-2022
如果执行命令过程中提示:Unable to find a match: mysql-community-server
则可以通过命令解决
yum module disable mysql
5、 启动 Mysql 服务
systemctl start mysqld.service
如果没有报错,进入第六步,
如果执行报错,多半是没有权限,执行下面语句赋予权限,然后重试
chown mysql:mysql -R /var/lib/mysql
6、查看Mysql运行状态
service mysqld status
7、查看初始密码(localhost:后面为初始密码)
[root@localhost mysql]# grep 'password' /var/log/mysqld.log
2022-06-09T05:55:28.006431Z 1 [Note] A temporary password is generated for root@localhost: pjMts,Aa3Yr,
如果能正常查看到,则OK;如果查看不到,则表示没有密码。
8 进入数据库
mysql -u root -p
输入命令后,点击回车,会让你输入密码,然后输入刚刚的初始密码(输密码的时候不可见),当然支持粘贴,你可以复制初始密码后,然后粘贴。如果没有密码,直接回车即可。
[root@localhost mysql]# mysql -u root -p
Enter password:
Welcome to the MySQL monitor. Commands end with ; or \g.
Your MySQL connection id is 3
Server version: 5.7.38
Copyright (c) 2000, 2022, Oracle and/or its affiliates.
Oracle is a registered trademark of Oracle Corporation and/or its
affiliates. Other names may be trademarks of their respective
owners.
Type 'help;' or '\h' for help. Type '\c' to clear the current input statement.
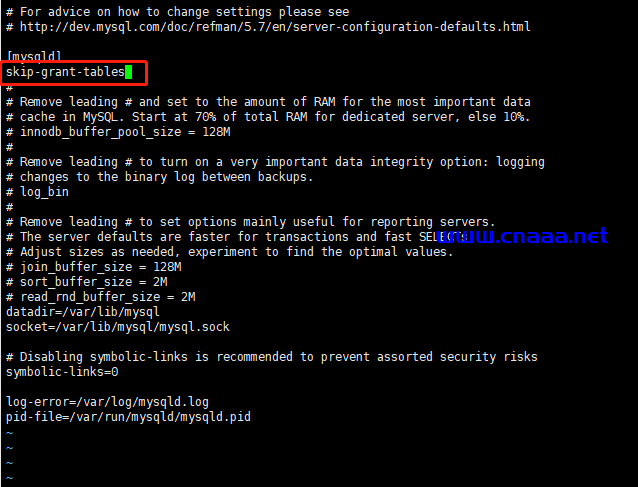
mysql> 注: 如果显示数据库无法访问
修改MySql配置文件my.cnf,新增skip-grant-tables
find / -name my.cnf
[root@localhost mysql]# find / -name my.cnf
/etc/my.cnf
修改文件之前记得先关闭mysql服务
service mysqld stop
通过 vi 指令进入文件
[root@localhost mysql]# vi /etc/my.cnf新增skip-grant-tables ,添加skip-grant-tables,这样mysql可以免密登录。

重启服务
service mysqld start
再次连接MySql,任意密码就可以进入了
mysql -u root -p
通过show databases;注意带;号可以查看数据库
mysql> show databases
    -> ;
+--------------------+
| Database           |
+--------------------+
| information_schema |
| mysql              |
| performance_schema |
| sys                |
+--------------------+
4 rows in set (0.01 sec)
若出现此提示:ERROR 1820 (HY000): You must reset your password using ALTER USER statement before executing this statement则需要去修改初始化的密码
重置密码为root,此命令适用于修改当前用户的密码
alter user user() identified by 'root'
mysql> alter user user() identified by 'root';
Query OK, 0 rows affected (0.00 sec)
如果执行命令时出现错误:ERROR 1819 (HY000): Your password does not satisfy the current policy requirements
则执行下方命令
mysql> set global validate_password_policy=LOW;
Query OK, 0 rows affected (0.00 sec)
mysql> set global validate_password_length=4;
Query OK, 0 rows affected (0.00 sec)
修改配置文件my.cnf,删除skip-grant-tables
重启服务
service mysqld start
根据指令进入MySQL数据库
mysql -uroot -p
再次使用新密码登录即可!
TIPS:如果本地访问Linux数据库失败,则记得看下下面配置是否OK
1、服务器的防火墙mysql端口3306是否开放
1、查看防火墙是否开放3306端口
[root@localhost mysql]# firewall-cmd --query-port=3306/tcp
no
2、设置3306端口为永久开放
[root@localhost mysql]# firewall-cmd --add-port=3306/tcp --permanent
success
3、查看firewalld状态,发现当前状态为dead则表示为开启
[root@localhost mysql]# systemctl status firewalld
4、关闭防火墙
[root@localhost mysql]# systemctl stop firewalld
5、开启防火墙(设置了新的端口记得先关闭,在重启)
[root@localhost mysql]# systemctl start firewalld
2、如果提示如下,则表示没有允许远程登录
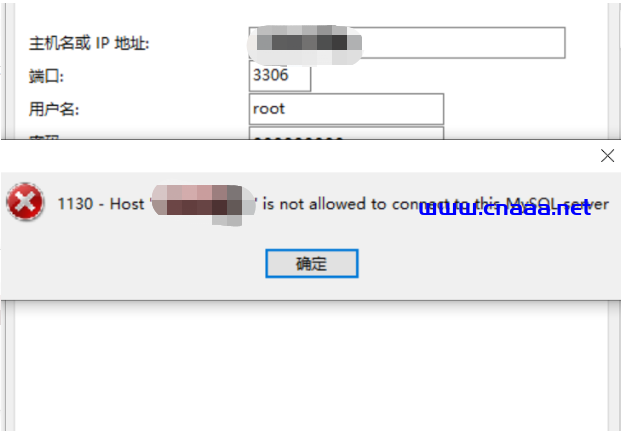
解决办法:
登录服务器上的mysql数据库,执行一下命令
mysql> use mysql
Reading table information for completion of table and column names
You can turn off this feature to get a quicker startup with -A
Database changed
mysql> update user set host = '%' where user = 'root';
Query OK, 1 row affected (0.00 sec)
Rows matched: 1 Changed: 1 Warnings: 0
mysql> flush privileges;
Query OK, 0 rows affected (0.00 sec)
文章来源:https://www.cnaaa.net,转载请注明出处:https://www.cnaaa.net/archives/4243