

如果是 Linux/MacOS 系统,可以通过以下命令安装:brew tap k8sgpt-ai/k8sgpt
brew install k8sgpt
RPM 包可以通过以下命令安装:curl -LO https://github.com/k8sgpt-ai/k8sgpt/releases/download/v0.3.4/k8sgpt_amd64.rpm
sudo rpm -ivh -i k8sgpt_amd64.rpm
DEB 包可以通过以下命令安装:curl -LO https://github.com/k8sgpt-ai/k8sgpt/releases/download/v0.3.4/k8sgpt_amd64.deb
sudo dpkg -i k8sgpt_amd64.deb
使用
目前默认的 AI 提供者是 OpenAI,所以我们需要从 OpenAI 生成 API 密钥,可以通过运行 k8sgpt generate 命令来打开浏览器链接生成密钥来完成此操作。
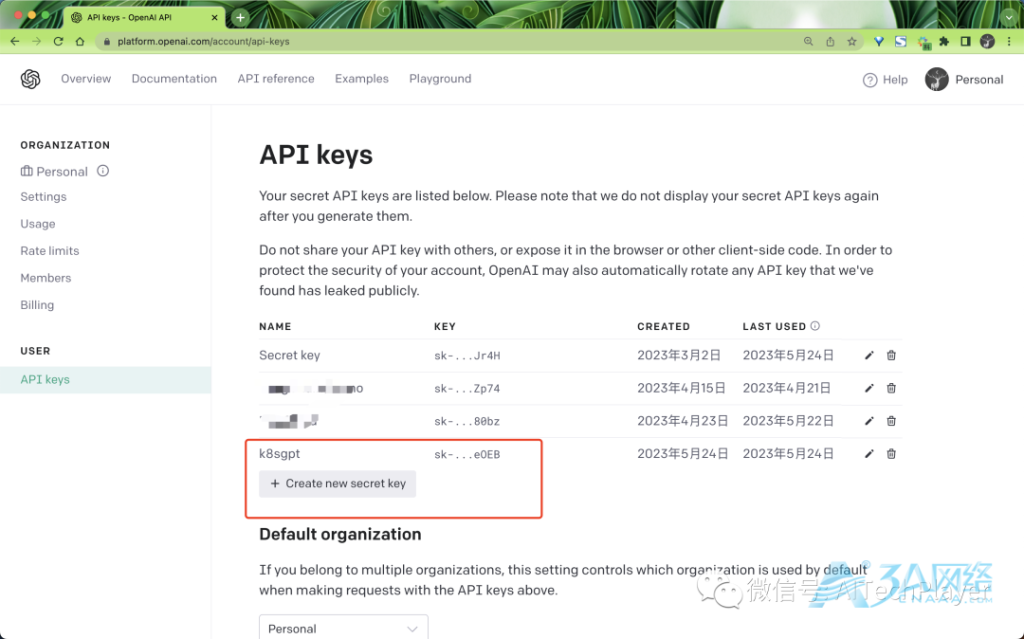

然后运行 k8sgpt auth add 命令输入上面生成的密钥即可完成配置。
K8sGPT 使用分析器来分类和诊断集群中的问题,它有一组内置的分析器,当然也可以编写自己的分析器。
- podAnalyzer
- pvcAnalyzer
- rsAnalyzer
- serviceAnalyzer
- eventAnalyzer
- ingressAnalyzer
- statefulSetAnalyzer
- deploymentAnalyzer
- cronJobAnalyzer
- nodeAnalyzer
- hpaAnalyzer
- pdbAnalyzer
- networkPolicyAnalyzer
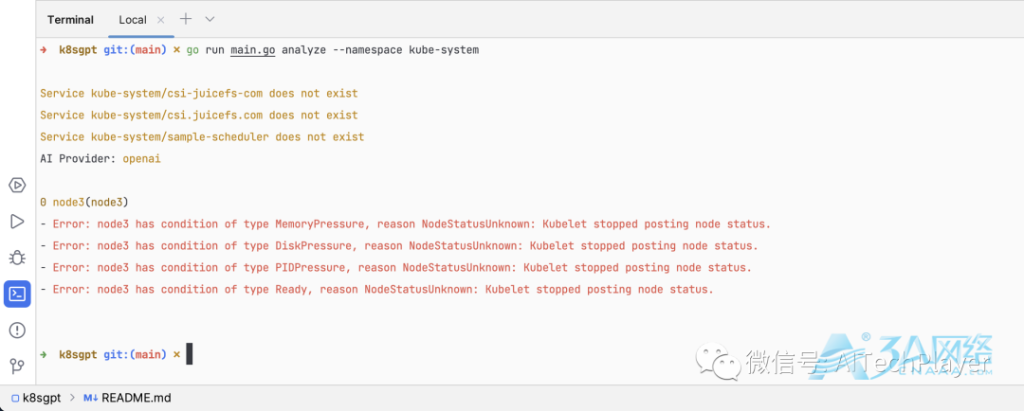
然后我们就可以通过运行 k8sgpt analyze 命令来分析集群中的问题,例如:k8sgpt analyze --namespace kube-system
该命令会将 kube-system 命名空间中的所有资源对象的事件提取出来。
在 analyze 命令后我们可以添加 --filter 或者 --namespace 参数来过滤分析的对象,例如:k8sgpt analyze --explain --filter=Pod --namespace=default
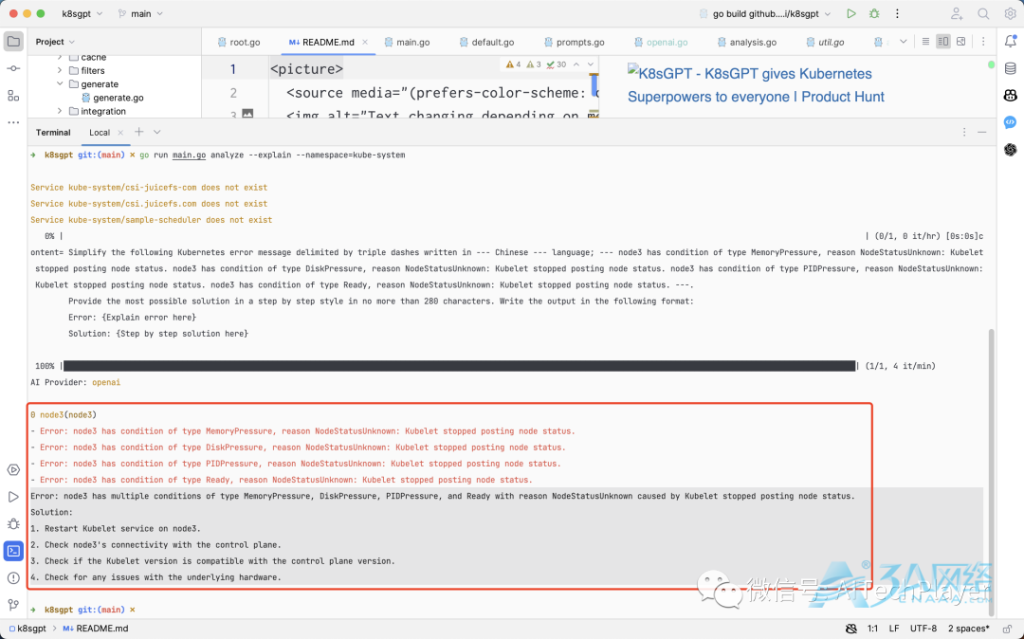
如果想要获取 AI 的解决方案,可以添加 --explain 参数,例如:k8sgpt analyze --explain --namespace=kube-system
该命令会将 kube-system 命名空间中的所有资源对象的事件提取出来,并且通过 AI 来获取解决方案。
当然如果我们不添加任何过滤参数,那么 analyze 命令会分析所有的资源对象的相关事件。
实现原理
该工具的实现方式比较简单,核心的 analyze 的命令定义如下所示:
var AnalyzeCmd = &cobra.Command{
 Use:     "analyze",
 Aliases: []string{"analyse"},
 Short:   "This command will find problems within your Kubernetes cluster",
 Long: `This command will find problems within your Kubernetes cluster and
 provide you with a list of issues that need to be resolved`,
 Run: func(cmd *cobra.Command, args []string) {

  // AnalysisResult configuration
  config, err := analysis.NewAnalysis(backend,
   language, filters, namespace, nocache, explain, maxConcurrency)
  if err != nil {
   color.Red("Error: %v", err)
   os.Exit(1)
  }

  config.RunAnalysis()

  if explain {
   err := config.GetAIResults(output, anonymize)
   if err != nil {
    color.Red("Error: %v", err)
    os.Exit(1)
   }
  }

  // print results
  output, err := config.PrintOutput(output)
  if err != nil {
   color.Red("Error: %v", err)
   os.Exit(1)
  }
  fmt.Println(string(output))
 },
}
可以看到 analyze 命令的核心是通过 analysis.NewAnalysis 函数来创建一个 AnalysisResult 对象,然后通过 config.RunAnalysis() 函数来运行分析器,最后通过 config.PrintOutput 函数来打印分析结果。
而 config.RunAnalysis() 函数的核心实现如下所示:
func (a *Analysis) RunAnalysis() {
 activeFilters := viper.GetStringSlice("active_filters")

 coreAnalyzerMap, analyzerMap := analyzer.GetAnalyzerMap()

 analyzerConfig := common.Analyzer{
  Client:    a.Client,
  Context:   a.Context,
  Namespace: a.Namespace,
  AIClient:  a.AIClient,
 }

 semaphore := make(chan struct{}, a.MaxConcurrency)
 // if there are no filters selected and no active_filters then run coreAnalyzer
 if len(a.Filters) == 0 && len(activeFilters) == 0 {
  var wg sync.WaitGroup
  var mutex sync.Mutex
  for _, analyzer := range coreAnalyzerMap {
   wg.Add(1)
   semaphore <- struct{}{}
   go func(analyzer common.IAnalyzer, wg *sync.WaitGroup, semaphore chan struct{}) {
    defer wg.Done()
    results, err := analyzer.Analyze(analyzerConfig)
    if err != nil {
     mutex.Lock()
     a.Errors = append(a.Errors, fmt.Sprintf("[%s] %s", reflect.TypeOf(analyzer).Name(), err))
     mutex.Unlock()
    }
    mutex.Lock()
    a.Results = append(a.Results, results...)
    mutex.Unlock()
    <-semaphore
   }(analyzer, &wg, semaphore)

  }
  wg.Wait()
  return
 }

    // ...... 省略部分代码
}
可以看到 RunAnalysis 函数的核心是通过 analyzer.GetAnalyzerMap() 函数来获取所有的分析器,然后通过 coreAnalyzerMap 来运行所有的分析器,最后通过 analyzer.Analyze 函数来运行分析器,核心的分析器包括如下内容:
var coreAnalyzerMap = map[string]common.IAnalyzer{
 "Pod":                   PodAnalyzer{},
 "Deployment":            DeploymentAnalyzer{},
 "ReplicaSet":            ReplicaSetAnalyzer{},
 "PersistentVolumeClaim": PvcAnalyzer{},
 "Service":               ServiceAnalyzer{},
 "Ingress":               IngressAnalyzer{},
 "StatefulSet":           StatefulSetAnalyzer{},
 "CronJob":               CronJobAnalyzer{},
 "Node":                  NodeAnalyzer{},
}
我们这里就以 PodAnalyzer 分析器为例,来查看下其实现方式,其核心的代码如下所示:
func (PodAnalyzer) Analyze(a common.Analyzer) ([]common.Result, error) {

 kind := "Pod"

 AnalyzerErrorsMetric.DeletePartialMatch(map[string]string{
  "analyzer_name": kind,
 })

 // search all namespaces for pods that are not running
 list, err := a.Client.GetClient().CoreV1().Pods(a.Namespace).List(a.Context, metav1.ListOptions{})
 if err != nil {
  return nil, err
 }
 var preAnalysis = map[string]common.PreAnalysis{}

 for _, pod := range list.Items {
  var failures []common.Failure
  // Check for pending pods
  if pod.Status.Phase == "Pending" {

   // Check through container status to check for crashes
   for _, containerStatus := range pod.Status.Conditions {
    if containerStatus.Type == "PodScheduled" && containerStatus.Reason == "Unschedulable" {
     if containerStatus.Message != "" {
      failures = append(failures, common.Failure{
       Text:      containerStatus.Message,
       Sensitive: []common.Sensitive{},
      })
     }
    }
   }
  }

  // Check through container status to check for crashes or unready
  for _, containerStatus := range pod.Status.ContainerStatuses {
   if containerStatus.State.Waiting != nil {
    if containerStatus.State.Waiting.Reason == "CrashLoopBackOff" || containerStatus.State.Waiting.Reason == "ImagePullBackOff" {
     if containerStatus.State.Waiting.Message != "" {
      failures = append(failures, common.Failure{
       Text:      containerStatus.State.Waiting.Message,
       Sensitive: []common.Sensitive{},
      })
     }
    }
    // This represents a container that is still being created or blocked due to conditions such as OOMKilled
    if containerStatus.State.Waiting.Reason == "ContainerCreating" && pod.Status.Phase == "Pending" {

     // parse the event log and append details
     evt, err := FetchLatestEvent(a.Context, a.Client, pod.Namespace, pod.Name)
     if err != nil || evt == nil {
      continue
     }
     if evt.Reason == "FailedCreatePodSandBox" && evt.Message != "" {
      failures = append(failures, common.Failure{
       Text:      evt.Message,
       Sensitive: []common.Sensitive{},
      })
     }
    }
   } else {
    // when pod is Running but its ReadinessProbe fails
    if !containerStatus.Ready && pod.Status.Phase == "Running" {
     // parse the event log and append details
     evt, err := FetchLatestEvent(a.Context, a.Client, pod.Namespace, pod.Name)
     if err != nil || evt == nil {
      continue
     }
     if evt.Reason == "Unhealthy" && evt.Message != "" {
      failures = append(failures, common.Failure{
       Text:      evt.Message,
       Sensitive: []common.Sensitive{},
      })

     }

    }
   }
  }
  if len(failures) > 0 {
   preAnalysis[fmt.Sprintf("%s/%s", pod.Namespace, pod.Name)] = common.PreAnalysis{
    Pod:            pod,
    FailureDetails: failures,
   }
   AnalyzerErrorsMetric.WithLabelValues(kind, pod.Name, pod.Namespace).Set(float64(len(failures)))
  }
 }

 for key, value := range preAnalysis {
  var currentAnalysis = common.Result{
   Kind:  kind,
   Name:  key,
   Error: value.FailureDetails,
  }

  parent, _ := util.GetParent(a.Client, value.Pod.ObjectMeta)
  currentAnalysis.ParentObject = parent
  a.Results = append(a.Results, currentAnalysis)
 }

 return a.Results, nil
}
Pod 分析器通过获取所有的 Pod 对象,然后通过 FetchLatestEvent 函数来获取 Pod 对象的事件,并将这些错误信息记录下来。
到这里其实还有 AI 没有任何关联,就是简单收集相关资源对象的事件,但是如果指定了 --explain 参数,那么就会通过 config.GetAIResults 函数来获取 AI 的解决方案了:
if explain {
    err := config.GetAIResults(output, anonymize)
    if err != nil {
        color.Red("Error: %v", err)
        os.Exit(1)
    }
}
GetAIResults 函数的核心实现如下所示:
func (a *Analysis) GetAIResults(output string, anonymize bool) error {
 if len(a.Results) == 0 {
  return nil
 }

 var bar *progressbar.ProgressBar
 if output != "json" {
  bar = progressbar.Default(int64(len(a.Results)))
 }

 for index, analysis := range a.Results {
  var texts []string

  for _, failure := range analysis.Error {
   if anonymize {
    for _, s := range failure.Sensitive {
     failure.Text = util.ReplaceIfMatch(failure.Text, s.Unmasked, s.Masked)
    }
   }
   texts = append(texts, failure.Text)
  }
  parsedText, err := a.AIClient.Parse(a.Context, texts, a.Cache)
  if err != nil {
   // FIXME: can we avoid checking if output is json multiple times?
   //   maybe implement the progress bar better?
   if output != "json" {
    _ = bar.Exit()
   }

   // Check for exhaustion
   if strings.Contains(err.Error(), "status code: 429") {
    return fmt.Errorf("exhausted API quota for AI provider %s: %v", a.AIClient.GetName(), err)
   } else {
    return fmt.Errorf("failed while calling AI provider %s: %v", a.AIClient.GetName(), err)
   }
  }

  if anonymize {
   for _, failure := range analysis.Error {
    for _, s := range failure.Sensitive {
     parsedText = strings.ReplaceAll(parsedText, s.Masked, s.Unmasked)
    }
   }
  }

  analysis.Details = parsedText
  if output != "json" {
   _ = bar.Add(1)
  }
  a.Results[index] = analysis
 }
 return nil
}
GetAIResults 函数的核心就是循环前面得到错误信息,然后通过 a.AIClient.Parse 函数来调用 AI 的相关接口来获取解决方案,默认的 AI 提供者是 OpenAI,前面我们提到过可以通过运行 k8sgpt generate 命令来打开浏览器链接生成密钥来完成相关配置。
通过 OpenAI 获取错误信息的解决方案的核心代码如下所示:
func (a *OpenAIClient) Parse(ctx context.Context, prompt []string, cache cache.ICache) (string, error) {
 inputKey := strings.Join(prompt, " ")
 // Check for cached data
 cacheKey := util.GetCacheKey(a.GetName(), a.language, inputKey)

 if !cache.IsCacheDisabled() && cache.Exists(cacheKey) {
  response, err := cache.Load(cacheKey)
  if err != nil {
   return "", err
  }

  if response != "" {
   output, err := base64.StdEncoding.DecodeString(response)
   if err != nil {
    color.Red("error decoding cached data: %v", err)
    return "", nil
   }
   return string(output), nil
  }
 }

 response, err := a.GetCompletion(ctx, inputKey)
 if err != nil {
  return "", err
 }

 err = cache.Store(cacheKey, base64.StdEncoding.EncodeToString([]byte(response)))

 if err != nil {
  color.Red("error storing value to cache: %v", err)
  return "", nil
 }

 return response, nil
}
将错误信息拼接成一个字符串,然后通过 a.GetCompletion 函数来调用 AI 的相关接口来获取解决方案,核心的 GetCompletion 函数的实现如下所示:
func (c *OpenAIClient) GetCompletion(ctx context.Context, prompt string) (string, error) {
 // Create a completion request
 content := fmt.Sprintf(default_prompt, c.language, prompt)
 resp, err := c.client.CreateChatCompletion(ctx, openai.ChatCompletionRequest{
  Model: c.model,
  Messages: []openai.ChatCompletionMessage{
   {
    Role:    "user",
    Content: content,
   },
  },
 })
 if err != nil {
  return "", err
 }
 return resp.Choices[0].Message.Content, nil
}
这里通过 Go 语言版本的 OpenAI SDK 去调用 OpenAI 的相关接口来获取解决方案,核心就是要拼凑 Prompts 提示词,默认的提示词内容如下所示:
default_prompt = `Simplify the following Kubernetes error message delimited by triple dashes written in --- %s --- language; --- %s ---.
 Provide the most possible solution in a step by step style in no more than 280 characters. Write the output in the following format:
 Error: {Explain error here}
 Solution: {Step by step solution here}
 `
然后是有 language 和错误信息格式化默认的提示词,并告诉 ChatGPT 一步一步的给出解决方案,输出的格式为:
Error: {Explain error here}
Solution: {Step by step solution here}
前面我们的测试结果就是该格式的输出。

所以整体上来说 k8sgpt 工具实现是非常简单的。
文章来源:https://www.cnaaa.net,转载请注明出处:https://www.cnaaa.net/archives/9545