

禅道介绍
禅道项目管理软件是国产的开源项目管理软件,专注研发项目管理,内置需求管理、任务管理、bug管理、缺陷管理、用例管理、计划发布等功能,实现了软件的完整生命周期管理。
禅道属于开源项目,有收费版,本次以开源版9.1.2进行搭建
提示:本地环境我们没有安装mysql,安装禅道环境需要LNMP或者LAMP,本地以LAP进行演示
php版本5.5.30
nginx版本1.10.3
环境准备
1. 配置repo源和安装常用命令
wget -O /etc/yum.repos.d/CentOS-Base.repo http://mirrors.aliyun.com/repo/Centos-6.repo
wget -O /etc/yum.repos.d/epel.repo http://mirrors.aliyun.com/repo/epel-6.repo
yum install -y net-tools vim wget lrzsz tree screen lsof tcpdump

2. 关闭防火墙selinux
/etc/init.d/iptables stop
sed -i 's/SELINUX=enforcing/SELINUX=disabled/' /etc/selinux/config
grep SELINUX=disabled /etc/selinux/config
setenforce 0

3. 调整文件描述符
echo '*   -    nofile   100000 ' >>/etc/security/limits.conf

4. 更新系统并重启yum update -y && reboot
一、安装nginx
[root@abcdocker ~]# wget http://nginx.org/download/nginx-1.10.3.tar.gz
[root@abcdocker ~]# yum install -y gcc glibc gcc-c++ prce-devel openssl-devel pcre-devel
[root@abcdocker ~]# useradd -s /sbin/nologin www -M
[root@abcdocker ~]# tar xf nginx-1.10.3.tar.gz && cd nginx-1.10.3

[root@abcdocker ~]# ./configure --prefix=/usr/local/nginx-1.10.3 --user=nignx --group=nginx --with-http_ssl_module --with-http_stub_status_module
[root@abcdocker ~]# make && make install
[root@abcdocker ~]# ln -s /usr/local/nginx-1.10.3 /usr/local/nginx

[root@localhost nginx-1.10.1]# netstat -lntp|grep nginx
tcp        0      0 0.0.0.0:80              0.0.0.0:*               LISTEN      7058/nginx: master
启动脚本
手动启动
[root@abcdocker ~]# /usr/local/nginx/sbin/nginx

脚本启动
#!/bin/bash# chkconfig: 2345 20 80
# description: Saves and restores system entropy pool for
##############################################
. /etc/init.d/functions
path=/usr/local/nginx/sbin/nginx
if [ $# -ne 1 ];then
   echo "please input {status|start|stop|restart|reload}"
fi
nginx_status(){
status=`lsof -i:80|wc -l`
if [ $status -gt 2 ];then
   echo "nginx is running "
   else
   echo  "nginx no running"
fi
}
##################
nginx_start(){
  $path
  if [ $? -eq 0 ];then
     action "nginx start" /bin/true
  else
     action "nginx no start" /bin/false
  fi


}
nginx_stop(){
  $path -s stop
  if [ $? -eq 0 ];then
     action "nginx stop" /bin/true
  else
     action "nginx no stop" /bin/false
  fi
}
nginx_restart(){
  $path -s stop
  if [ $? -eq 0 ];then
     action "nginx stop" /bin/true
  else
     action "nginx no stop" /bin/false
  fi
  sleep 3
  $path
  if [ $? -eq 0 ];then
     action "nginx start" /bin/true
  else
     action "nginx no start" /bin/false
  fi
}
nginx_reload(){
  $path -s reload
  if [ $? -eq 0 ];then
     action "nginx reload" /bin/true
  else
     action "nginx no reload" /bin/false
  fi
}
case "$1" in
start)
     nginx_start
;;
stop)
     nginx_stop
;;
restart)
     nginx_restart
;;
reload)
     nginx_reload
;;
status)
     nginx_status
;;
esac
二、安装PHP
本次php采用5.6.30
php下载目录:http://php.net/downloads.php
安装PHP基础库
yum install zlib-devel libxml2-devel libjpeg-devel libjpeg-turbo-devel libiconv-devel -y
yum install freetype-devel libpng-devel gd-devel libcurl-devel libxslt-devel libxslt-devel -y
rpm -qa zlib-devel libxml2-devel libjpeg-devel libjpeg-turbo-devel libiconv-devel freetype-devel libpng-devel gd-devel libcurl-devel libxslt-devel

下载安装
http://php.net/downloads.php

需要先安装支持的软件包
wget http://ftp.gnu.org/pub/gnu/libiconv/libiconv-1.14.tar.gz
tar zxf libiconv-1.14.tar.gz
cd libiconv-1.14
./configure --prefix=/usr/local/libiconv
make
make install

PHP相关扩展库
wget -O /etc/yum.repos.d/epel.repo http://mirrors.aliyun.com/repo/epel-6.repo
yum -y install libmcrypt-devel
yum -y install mhash
yum -y install mcrypt
yum -y install libmcrypt-devel


编译
./configure
--prefix=/usr/local/php5.6.30
--with-config-file-path=/usr/local/php56/etc
--enable-inline-optimization
--disable-debug
--disable-rpath
--enable-shared
--enable-opcache
--enable-fpm
--with-fpm-user=nginx
--with-fpm-group=nginx
--with-mysql=mysqlnd
--with-mysqli=mysqlnd
--with-pdo-mysql=mysqlnd
--with-gettext
--enable-mbstring
--with-iconv
--with-mcrypt
--with-mhash
--with-openssl
--enable-bcmath
--enable-soap
--with-libxml-dir
--enable-pcntl
--enable-shmop
--enable-sysvmsg
--enable-sysvsem
--enable-sysvshm
--enable-sockets
--with-curl
--with-zlib
--enable-zip
--with-bz2
--with-readline

[root@abcdocker ~]# make && make install
[root@abcdocker ~]# ln -s /usr/local/php5.6.30/  /usr/local/php
[root@abcdocker ~]# cp php5.6.30/php.ini-development /usr/local/php/lib/php.ini
[root@abcdocker ~]# cp /usr/local/php/etc/php-fpm.conf.default /usr/local/php/etc/php-fpm.conf
启动
手动启动
[root@abcdocker ~]# /usr/local/php/sbin/php-fpm

脚本启动
#!/bin/bash
# chkconfig: 2345 20 80
# description: Saves and restores system entropy pool for
##############################################

./etc/init.d/functions
path=/application/php/sbin/php-fpm
status=`lsof -i:9000|wc -l`
########################
if [ $# -ne 1 ];then
   echo "please input {status|start|stop|restart}"
fi
php_status(){
if [ $status -lt 3 ];then
   echo "php no running"
else
   echo "php is running"
fi
}php_start(){
  $path
      if [ $? -ne 0 ];then
    action "php running error" /bin/false
      else
    action "php is running" /bin/true
      fi
}
php_stop(){
  pkill php-fpm
      if [ $? -ne 0 ];then
    action "php stop error" /bin/false
      else
    action "php is stop" /bin/true
      fi
}
case "$1" in
status)
   php_status
;;
start)
   php_star
t;;
stop)
   php_stop
;;
restart)
   php_stop
   sleep 3
   php_start
;;
esac

####################################
加入开机启动
chkconfig --add
phpchkconfig php on
php与nginx结合
nginx.conf配置如下
[root@php conf]# cat nginx.conf
user  nginx;
worker_processes  2;
error_log  /var/log/nginx/error.log;
pid        /var/run/nginx.pid;


events {
    use epoll;
    worker_connections  65535;
}


http {
    include       mime.types;
    default_type  application/octet-stream;

    log_format  main  '$remote_addr - $remote_user [$time_local] "$request" '
                      '$status $body_bytes_sent "$http_referer" '
                      '"$http_user_agent" "$http_x_forwarded_for"';
   access_log  /var/log/nginx/access.log  main;
   server_tokens off;
    sendfile        on;
    tcp_nopush     on;
    keepalive_timeout  65;
    tcp_nodelay on;
    client_header_buffer_size 4k;
    open_file_cache max=65535 inactive=60s;
    open_file_cache_valid 80s;
    client_body_buffer_size 512k;
    large_client_header_buffers 4 512k;
    proxy_connect_timeout 30;
    proxy_read_timeout 60;
    proxy_send_timeout 20;
    proxy_buffering on;
    proxy_buffer_size 16k;
    proxy_buffers 4 64k;
    proxy_busy_buffers_size 128k;
    proxy_temp_file_write_size 128k;
    gzip  on;
    gzip_min_length 1k;
    gzip_buffers 4 16k;
    gzip_http_version 1.1;
    gzip_comp_level 2;
    gzip_types text/plainapplication/x-javascript text/css application/xml;
    gzip_vary on;
 include /application/nginx/conf/extra/*.conf;

}
server标签配置如下
[root@php extra]# cat zentao.conf
server {

    listen       80;
    server_name  域名;
    access_log  /var/log/nginx/zentao_access.log main;
        root   /application/php_php/zentao/www;
    location / {
        index  index.php index.html index.htm;
    }
    location ~ .*.(php|php5)?$ {
        fastcgi_pass  127.0.0.1:9000;
        fastcgi_index index.php;
        include fastcgi.conf;
    }
}
因为我本次演示环境的架构属于一台没有外网的web,通过nginx代理。下面是nginx代理的server标签配置
nginx 代理节点server配置
upstream zentao {
    server 10.117.215.78;
}
server {
    listen       80;
    server_name  abcdocker.com;
     access_log  /var/log/nginx/zentao_access.log main;
      location / {
        root   html;
        index  index.html index.htm;
         proxy_pass  http://zentao;
        proxy_set_header Host $http_host;
        proxy_set_header X-Real-IP $remote_addr;
        proxy_set_header X-Forwarded-For $proxy_add_x_forwarded_for;
        client_max_body_size 300m;

     }

}
下载禅道
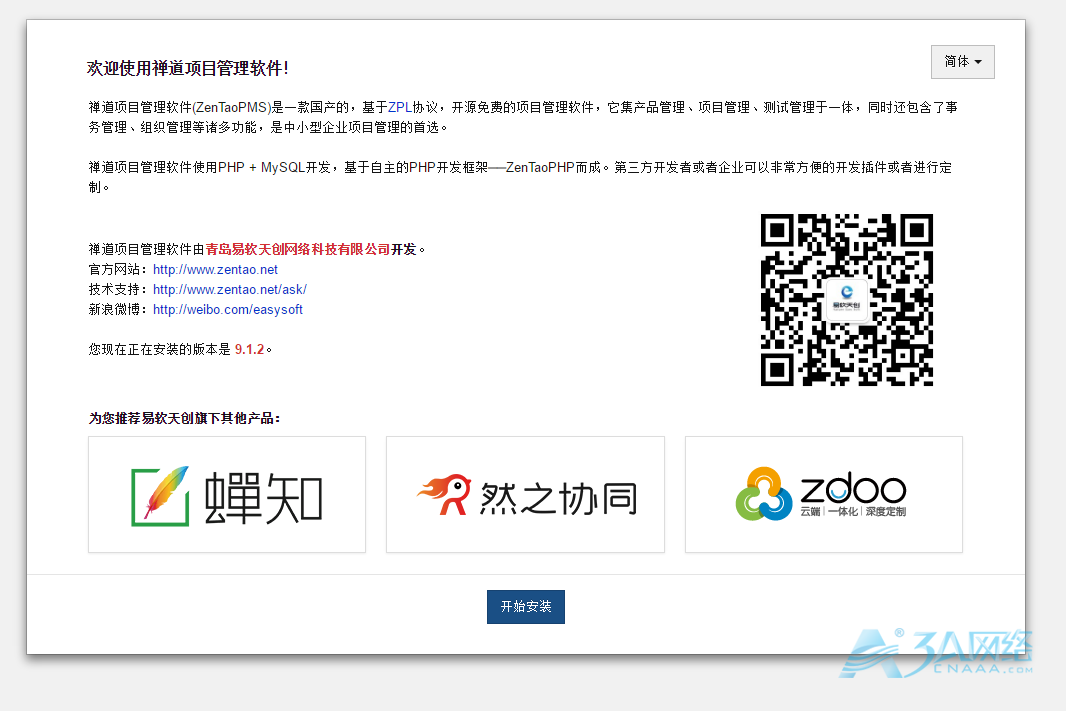
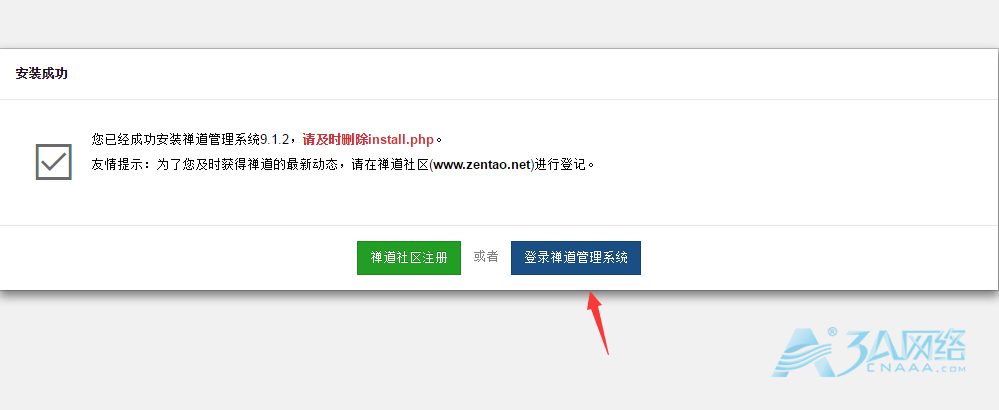
[root@abcdocker]# wget http://dl.cnezsoft.com/zentao/9.1.2/ZenTaoPMS.9.1.2.zip
将程序解压访问即可,我们nginx站点目录设置如下:php_php/zentao/www;
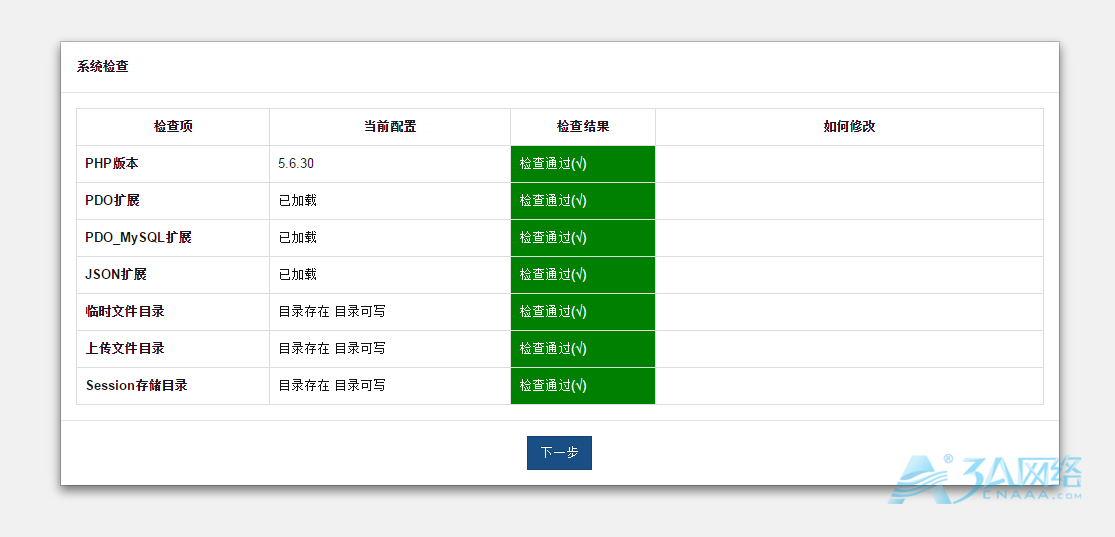
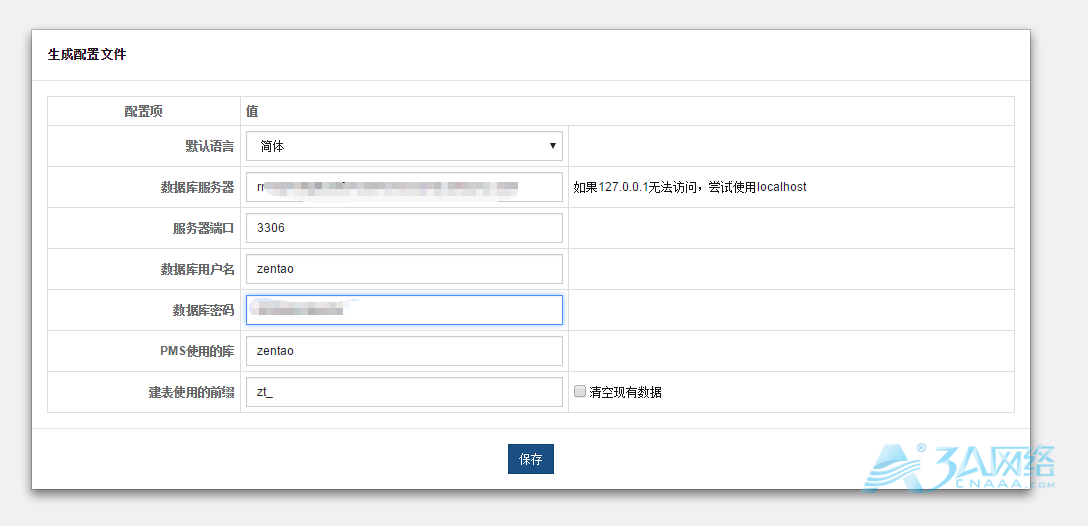
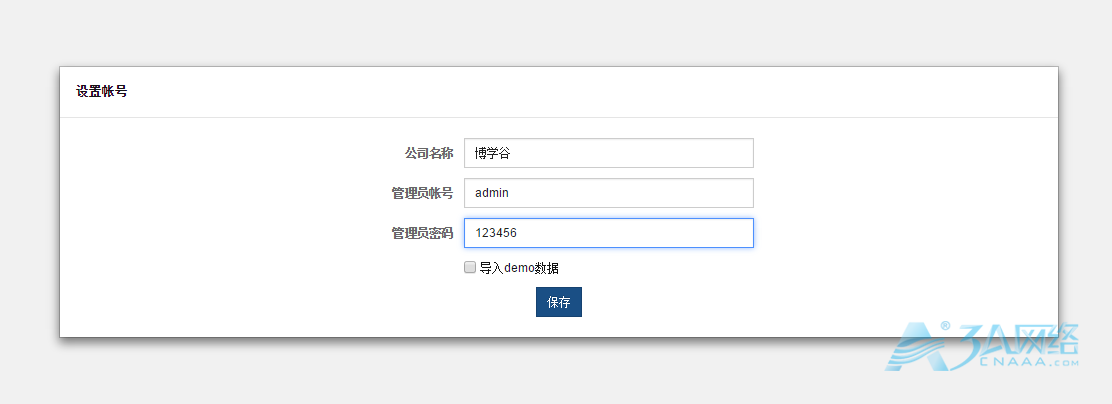
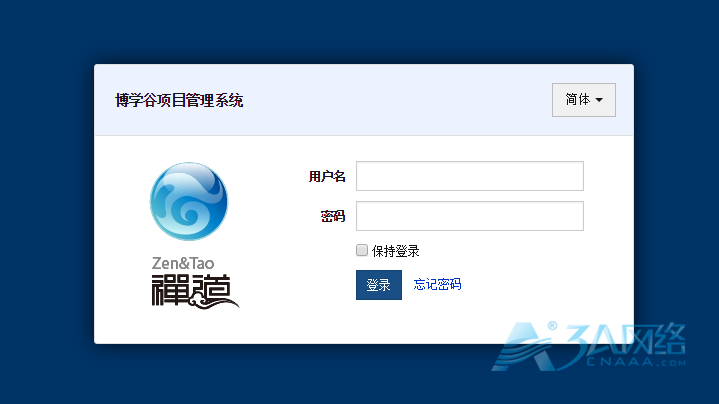
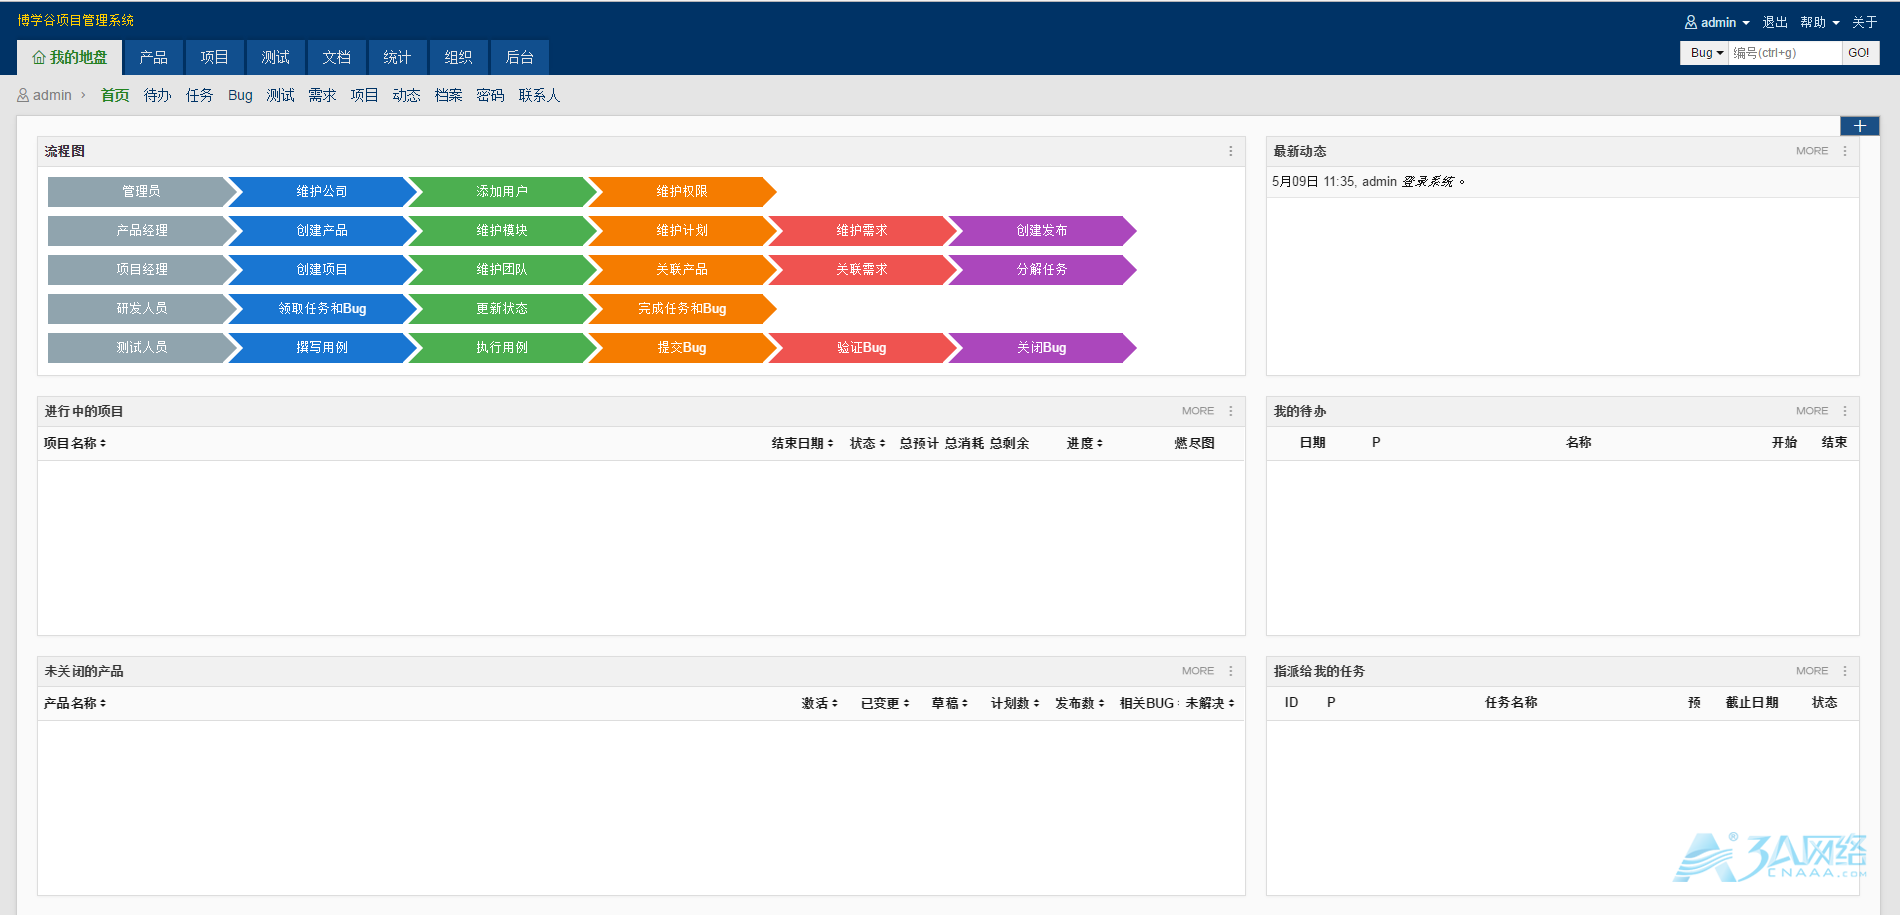
直接访问IP or域名 即可配置

文章来源:https://www.cnaaa.net,转载请注明出处:https://www.cnaaa.net/archives/8103